Page 1 of 3 123 LastLast
Results 1 to 50 of 136

Thread: My 3D Printer has arrived - But I am out of town!

  1. #1
    Awards Officer
    2nd Lieutenant
    United States

    Join Date
    Feb 2013
    Location
    Prescott, Arizona
    Log Entries
    661
    Name
    Bruce

    Default My 3D Printer has arrived - But I am out of town!

    So my 3D printer has arrived!
    But I am out of town on business...
    While anxiously waiting to return and unpack it, I have started working on what will be my first project once I have my "3D Legs" under me.
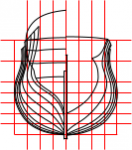
    This is a vector drawing I made from an old lines drawing I had. I will import this to my 3D software and start modeling today.
    Pictures of 3D printer to follow.
    Name:  HMS_Victory_Lines.jpg
Views: 1829
Size:  80.4 KB

  2. #2
    Retired Admiral of the Fleet
    Admiral
    United States

    Join Date
    Jan 2013
    Location
    Chicago/Bloomington IL
    Log Entries
    5,095
    Name
    Eric

    Default

    Bruce, it will be exciting to see your work. Thanks for sharing with us.

  3. #3
    Awards Officer
    2nd Lieutenant
    United States

    Join Date
    Feb 2013
    Location
    Prescott, Arizona
    Log Entries
    661
    Name
    Bruce

    Default Update - Lines Imported to Maya

    The lines drawings have been imported into Maya and aligned.

    Name:  HMS_Victory_Lines_Maya.jpg
Views: 1726
Size:  130.6 KB

  4. #4
    Awards Officer
    2nd Lieutenant
    United States

    Join Date
    Feb 2013
    Location
    Prescott, Arizona
    Log Entries
    661
    Name
    Bruce

    Default Keel, Stem, and Half Hull Frames in Place

    The Keel, Stem, and half hull frames have now been "lofted".

    Actually, in the virtual 3D modeling world scale is completely maleable so no lofting is necessary. Frames can just be traced at full size.
    No caulking will be necessary either.

    There will, however, be a lot of fairing to do...

    Name:  SS_002.jpg
Views: 1728
Size:  129.0 KB

    Name:  SS_003.jpg
Views: 1788
Size:  116.8 KB

  5. #5

    Default

    Interesting stuff Bruce. You could possibly have ships in production before Ares! You might even corner the market ;)

  6. #6
    Awards Officer
    2nd Lieutenant
    United States

    Join Date
    Feb 2013
    Location
    Prescott, Arizona
    Log Entries
    661
    Name
    Bruce

    Default No Production Plans... Yet

    I really don't know where I am going with this, but I thought that it might be worthwhile for the group if I documented the creation of a ship from hull line drawings to finished model.

    I have not used my new 3D printer yet (I have not even opened the box) so I do not know how long it will take me to get up to speed with the technology.

    I have also not done any casting, in any medium, of anything this detailed, small, and complex, so I don't know how that will go either.

    On the plus side I have spent many hours building wooden ship models from kits from Mantua, Mamoli, and the like so I am not completely new to this process (hey, most of the top end wooden ship model kit makers seem to be Italian too, hmmm).

    It will be an adventure. I can't wait to see how it all goes.

  7. #7
    Retired Admiral of the Fleet
    Admiral
    United States

    Join Date
    Jan 2013
    Location
    Chicago/Bloomington IL
    Log Entries
    5,095
    Name
    Eric

    Default

    I think this is very informative. At present, I, for one, am pretty ignorant of ship design and terminology, so I am really looking forward to working through your posts. Thank you for doing and sharing this.

    Quote Originally Posted by RichardPF View Post
    (hey, most of the top end wooden ship model kit makers seem to be Italian too, hmmm).
    Are you Italian?

  8. #8
    Awards Officer
    2nd Lieutenant
    United States

    Join Date
    Feb 2013
    Location
    Prescott, Arizona
    Log Entries
    661
    Name
    Bruce

    Default

    Actually, I am not. But the Ares Games folks are.

  9. #9
    Retired Admiral of the Fleet
    Admiral
    United States

    Join Date
    Jan 2013
    Location
    Chicago/Bloomington IL
    Log Entries
    5,095
    Name
    Eric

    Default

    Quote Originally Posted by RichardPF View Post
    Actually, I am not. But the Ares Games folks are.
    Got it. Saw you just joined the Aerodrome as well - two great places.

  10. #10
    Awards Officer
    2nd Lieutenant
    United States

    Join Date
    Feb 2013
    Location
    Prescott, Arizona
    Log Entries
    661
    Name
    Bruce

    Default

    Yes, it seems kind of weird to me. My two big time interests have always been WWI aviation and Napoleonic era ships and here they both are so closely connected. Amazing…

  11. #11

    Default

    Quote Originally Posted by RichardPF View Post
    Yes, it seems kind of weird to me. My two big time interests have always been WWI aviation and Napoleonic era ships and here they both are so closely connected. Amazing…
    It was the same with me. When I saw Series 1 and 2 WWI Wings of War aircraft, with WWI aviation being one of my greatest interests, I had to have them. In trying to find news about future releases, I came upon the Aerodrome. After lurking there for a while I saw what a great bunch of people were on the site and joined up. When it came out that Sails of Glory, about Napoleonic era naval warfare...my other favorite subject, I couldn't believe it.

  12. #12
    Awards Officer
    2nd Lieutenant
    United States

    Join Date
    Feb 2013
    Location
    Prescott, Arizona
    Log Entries
    661
    Name
    Bruce

    Default 3D Printer - OUT OF THE BOX!!!

    So my work week has come to an end (more or less) and I finally got a chance to unpack the 3D printer.
    This is the Second generation Cube printer from 3D Systems, a company that seems to be taking over the 3D printer market through both growth and acquisition.


    Name:  3D_Printer_001s.JPG
Views: 1611
Size:  76.6 KB
    The box as it arrived in the shipping box sitting on a table in my garage.


    Name:  3D_Printer_002s.JPG
Views: 1551
Size:  73.1 KB
    Top of the box open...


    Name:  3D_Printer_003s.JPG
Views: 1632
Size:  64.3 KB
    The box contained the printer and three extra spools of plastic.
    When you buy the printer there is a special deal that 3D Systems offers at the time of purchase for three extra spools of plastic and some object designer software. It was really too good an add on deal for me to pass up.
    Total price for the printer, extra plastic & software deal, and shipping to Arizona was just under $1,600.


    Name:  3D_Printer_004s.JPG
Views: 1513
Size:  73.5 KB
    After releasing a couple of clips, the top of the box lifts off to reveal the printer.
    It is very well packed.


    Name:  3D_Printer_005s.JPG
Views: 1540
Size:  83.2 KB
    When you lift the printer out of the box, you will find a lower box section full of goodies.
    The first item that you remove is the base where the 3D objects come to life (on the left sitting on the plastic spool boxes).
    But wait! There's more...

    Name:  3D_Printer_006s.JPG
Views: 1521
Size:  92.0 KB
    The remaining contents of the bottom of the box include a USB cable, a USB thumb drive (you can pass object files to the printer using either method or by WiFi), a power supply and cord, another spool of line (neon green), a small bottle of goop that you use to prep the base so the 3D model stays put while it is being built, an interesting tool of some kind, and a manual. The printer also comes with 25 credits to download object files from the 3D Systems library.

    OK, that's about it for now. While the manual is more like a pamphlet, I am someone who does RTFM.
    More to come.

  13. #13
    Retired Admiral of the Fleet
    Admiral
    United States

    Join Date
    Jan 2013
    Location
    Chicago/Bloomington IL
    Log Entries
    5,095
    Name
    Eric

    Default

    I am pretty curious to see how this works. If you don't mind sharing, it would be interesting to see the process in play as well as the final output. Thanks for the pics.

  14. #14
    Comptroller of the Navy Board
    Captain
    United States

    Join Date
    Feb 2012
    Location
    WA
    Log Entries
    4,300
    Name
    [RESTRICTED]

    Default

    Nice! I've been looking into stereolithography as an aid to both my scale-modeling and gunsmithing hobbies... like a new rotor hub for a speculative "CH-53E Super Stallion On Steroids" or new weapons pylons for an up-armed "Super Prowler" conversion of an EA-6B.

    If you can find the lines diagrams, this might be JUST the ticket for some of the real pain-in-the-arse one-of-a-kind ships that fill key niches in the Orders of Battle for the great engagements, but as oddballs are likely to go without official Ares sculpts. :)

  15. #15

    Default

    Cant wait to see it in action. I have numerous 3d aircraft from Shapeways, so I think the technology to do hulls will be quite successful, the masts and sails may need to be done separately on a model like sprue.

  16. #16
    Awards Officer
    2nd Lieutenant
    United States

    Join Date
    Feb 2013
    Location
    Prescott, Arizona
    Log Entries
    661
    Name
    Bruce

    Default 3D Printer Setup part 1

    So Now I have read the instruction manual/pamphlet and am ready to continue...


    Name:  3D_Printer_007.jpg
Views: 1546
Size:  95.6 KB
    Out of the box, the Cube printer is close to completely assembled and ready to go.
    3D Systems is really trying to make this a consumer friendly product.
    The platform on which the 3D objects will be born is a thick piece of glass that is frosted on one side.
    The glass platform comes packed in the bottom of the Cube box in a very serious foam enclosure to keep it safe (shown in an earlier photo).
    There is a plastic rectangle with a clipped corner attached to the non frosted side of the glass.


    Name:  3D_Printer_008.jpg
Views: 1500
Size:  124.4 KB
    The key is placed in a matching receptacle on the machine. The shape of the key makes attachment mistake proof.


    Name:  3D_Printer_009.jpg
Views: 1528
Size:  101.4 KB
    There are no mechanical fasteners, the glass plate stays in place through gravity and magnetism.


    Name:  3D_Printer_010.jpg
Views: 1555
Size:  91.9 KB
    The next step is to bring up the 3D Systems website and register your cube.
    http://www.cubify.com/cube/


    Name:  3D_Printer_011.jpg
Views: 1585
Size:  91.2 KB
    The first step is to create an account and login.


    Name:  3D_Printer_012.jpg
Views: 1555
Size:  93.3 KB
    Once logged in, select Activate My Cube.


    Name:  3D_Printer_014.jpg
Views: 1619
Size:  68.0 KB
    A page where you will enter your cube serial number is displayed.


    Name:  3D_Printer_013.jpg
Views: 1471
Size:  114.4 KB
    You will need the serial number of the cube to activate it.
    It is found on the back next to the power connection.
    (The cube does not need to be powered up just yet, though the instructions do say to do it now)
    Last edited by RichardPF; 03-02-2013 at 20:10.

  17. #17
    Awards Officer
    2nd Lieutenant
    United States

    Join Date
    Feb 2013
    Location
    Prescott, Arizona
    Log Entries
    661
    Name
    Bruce

    Default 3D Printer Setup part 2

    And the beat goes on...

    Name:  3D_Printer_015.jpg
Views: 1418
Size:  75.2 KB
    Once you have entered your cube serial number you will be given an activation code for your printer (not 0000).
    This page also includes links to download the Cube software (either Windows or MAC), the 25 free object files, and another users guide/manual


    Name:  3D_Printer_016.jpg
Views: 1499
Size:  50.4 KB
    The Cube software for Windows includes exe and msi files.


    Name:  3D_Printer_017.jpg
Views: 1536
Size:  81.1 KB
    The 25 object files (.creation extension)


    Name:  3D_Printer_018.jpg
Views: 1506
Size:  48.4 KB
    And a 60 page users guide/manual


    Name:  3D_Printer_019.jpg
Views: 1407
Size:  87.9 KB
    The manual is a pdf file which could be read from the screen but I chose to print it out.

    Name:  3D_Printer_021.jpg
Views: 1399
Size:  87.9 KB
    You may have noticed in the background of some of these images that while my garage does not contain any cars, it does include a rather oversized laser printer (Canon imageRUNNER ADVANCE 8085)


    Name:  3D_Printer_020.jpg
Views: 1399
Size:  113.0 KB
    Some of the information duplicates what is in the manual/pamphlet that came with the cube, but it is a good bit more substantial.
    So now I am back in RTFM mode.

    More to come.

  18. #18

    Default

    Bruce, your garage is better equipped than most offices I've seen!

  19. #19
    Midshipman
    Netherlands

    Join Date
    Mar 2013
    Location
    North Holland
    Log Entries
    362
    Name
    Chris

    Default

    I think most of us here are as eager as you are to see the results Bruce. The wait for the next installment is almost too much. :D

  20. #20
    Awards Officer
    2nd Lieutenant
    United States

    Join Date
    Feb 2013
    Location
    Prescott, Arizona
    Log Entries
    661
    Name
    Bruce

    Default

    Quote Originally Posted by Sea Gull View Post
    I think most of us here are as eager as you are to see the results Bruce. The wait for the next installment is almost too much. :D
    Sorry for the delay in posting the next update; it's that annoying work thing getting in the way again!

  21. #21
    Midshipman
    Netherlands

    Join Date
    Mar 2013
    Location
    North Holland
    Log Entries
    362
    Name
    Chris

    Default

    Quote Originally Posted by RichardPF View Post
    Sorry for the delay in posting the next update; it's that annoying work thing getting in the way again!
    Ahh. I don't have to worry about that for a few weeks, or even months, yet. :o

  22. #22
    Ordinary Seaman
    United States

    Join Date
    Dec 2011
    Location
    Ohio
    Log Entries
    27
    Name
    Brian

    Default

    Very nice. I can't wait to see how it prints for you. I wish I had your patience and skill.

  23. #23
    Awards Officer
    2nd Lieutenant
    United States

    Join Date
    Feb 2013
    Location
    Prescott, Arizona
    Log Entries
    661
    Name
    Bruce

    Default Meanwhile, Back in the Virtual 3D World...

    I am finally getting back to working with my 3D printer and continuing to work on something of my own design for it to print.

    I will be posting more 3D Printer updates as soon as I can select the pictures and get them in order. In the meantime, I have planked the 3D hull.

    Name:  Hull_001.jpg
Views: 1447
Size:  96.2 KB

    Name:  Hull_002.jpg
Views: 1427
Size:  80.8 KB

  24. #24
    Awards Officer
    2nd Lieutenant
    United States

    Join Date
    Feb 2013
    Location
    Prescott, Arizona
    Log Entries
    661
    Name
    Bruce

    Default Continuing the 3D Printer Story

    Picking up the 3D Printer setup and first operation story from a week or so ago...

    Name:  Printer_001.jpg
Views: 1464
Size:  57.5 KB

    The next step is to install the software that lets you build files for and talk to the Cube printer.
    The install setup was quite conventional.

    Name:  Printer_002.jpg
Views: 1382
Size:  50.8 KB

    And went off without a hitch.

    Name:  Printer_003.jpg
Views: 1307
Size:  73.0 KB

    The software interface is a little odd, but fairly easy to master.
    The colors are a little funky, but there are no menus to deal with.

    Name:  Printer_004.jpg
Views: 1422
Size:  70.5 KB

    The Colors button opens a window that lets you change many of the colors in the system.
    I changed the background to white.

    Name:  Printer_005.jpg
Views: 1440
Size:  131.5 KB

    Next you import a file to print.
    Most 3D printers accept files with a .stl extension (Stereolithography)
    I will talk morfe about that when I describe building objects from your own designs.
    The cube software also accepts files with a .creation extension.
    That is the format of the objects you get with the cube.

    Name:  Printer_006.jpg
Views: 1369
Size:  78.6 KB

    The virtual object will be imported and placed in the view.
    The print space is about 5 inches on each side.
    It is generally best if the objects are positioned and sized before they are brought into the Cube software but they can be reconfigured here.
    I will start with that in the next installment (which should be Friday)

  25. #25
    Awards Officer
    2nd Lieutenant
    United States

    Join Date
    Feb 2013
    Location
    Prescott, Arizona
    Log Entries
    661
    Name
    Bruce

    Default 3D Printer Story Continues...

    When we left our story, I was in the middle of describing the functions of the 3D Printer software.
    It is probably best that you configure the object to be printed in another software package,
    but the cube software does have some configuration capability.

    Name:  Printer_101.jpg
Views: 1440
Size:  101.7 KB

    At the top center of the screen is a button that lets you orient and scale the object.
    Clicking this button opens a control window that lets you set these parameters.
    There are three sections (window/overlays) to this control.
    The first lets you rotate the object to be printed along any axis using either the dials or the text entry boxes at the bottom.

    Name:  Printer_102.jpg
Views: 1367
Size:  97.9 KB

    The second screen lets you translate the object around the base.
    While you would probably want to position a single object in the center of the base, the printer can (space permitting) print multiple objects.
    This control lets you arrange the objects in the print space.

    Name:  Printer_103.jpg
Views: 1367
Size:  91.1 KB

    The last control screen lets you scale the object withing the bounds of the print space.

    Name:  Printer_104.jpg
Views: 1360
Size:  64.3 KB

    The controls on the bottom left let you view the object from set viewing positions.
    You can also click and drag in the window to free form rotate the view.
    These controls rotate the view, not the object.

    Name:  Printer_105.jpg
Views: 1394
Size:  78.1 KB

    The settings button lets you set the system to print an object either solid, hollow, or with internal bracing (strong) which is between the two.
    You can also select the type of filament to be used (ABS or PLA plastic), which generation cube you have (mine is 2nd gen).
    You can also set the system to create Rafts and Supports.

    Rafts are a lattice base that you can create as a foundation for building your model. One of the problems with 3D printing is getting the object to hold fast to the base so that the object builds correctly. Rafts help that happen. Once the object is complete, the rafts can be detatched.

    Another problem with 3D printing is that a structure must be placed on something. At the base this is not a problem, but higher up on the model it is. Creating the horizontal top of a window opening is problematic. When you turn on supports, the system automatically adds easily detachable support structures to the object so that horizontal and near horizontal structure sections can be built.

    Name:  Printer_106.jpg
Views: 1366
Size:  95.8 KB

    When the object has been configured as you want, select the build icon/button at the top of the screen.
    The system will prompt you for a name and a location for this file.
    The file will be created with a .cube extension.
    This is the native format for the cube printer.

    Name:  Printer_107.jpg
Views: 1377
Size:  75.9 KB

    The file will be configured to your settings and saved.
    Rafts and supports will be added is requested.
    The software will create a build plan for the object.
    Finally, the software will let you know how long it will take the cube to run the job and print the object.
    3D printing takes some time. The finer resolution and the bigger the object the more time.
    Start Trek replicators these are not.
    The 23rd century this is not (that almost sounded a bit Yoda-ish).


    More to come...

  26. #26
    Midshipman
    Netherlands

    Join Date
    Mar 2013
    Location
    North Holland
    Log Entries
    362
    Name
    Chris

    Default

    Hey Yoda (;)) this is looking good and is very informative. Like you looking to see the first object produced.

  27. #27
    Retired Admiral of the Fleet
    Admiral
    United States

    Join Date
    Jan 2013
    Location
    Chicago/Bloomington IL
    Log Entries
    5,095
    Name
    Eric

    Default

    Bruce, this is very informative. I know everyone who is following these posts is dreaming of you printing ships and showing us your work.

    When you actually set the printer for a job, would it be possible to film it in action?

    Very cool stuff.

  28. #28
    Able Seaman
    United States

    Join Date
    Mar 2013
    Location
    Florida
    Log Entries
    57
    Name
    Charles

    Default

    This is GREAT,always wondered how these work,keep them coming and thanks

  29. #29
    Ordinary Seaman
    United States

    Join Date
    Mar 2013
    Location
    Texas
    Log Entries
    42
    Name
    Travis

    Default

    very informative thanks i want one now lol

  30. #30
    Awards Officer
    2nd Lieutenant
    United States

    Join Date
    Feb 2013
    Location
    Prescott, Arizona
    Log Entries
    661
    Name
    Bruce

    Default 3D Printer Story Continues to Continue...

    Now that the object file is ready to print, the next thing to do is to send the file to the 3D Printer.
    With the Cube, this can be done in two ways. The most interesting is through a Wi Fi connection.

    Name:  Printer_201.png
Views: 1258
Size:  44.2 KB

    With the Cube powered up, if you open the list of Wi Fi connections available, you will find a listing for the cube.
    Select it and connect.

    Name:  Printer_202.jpg
Views: 1344
Size:  75.2 KB

    Back in the Cube software, click the Configure button/icon.

    Name:  Printer_203.jpg
Views: 1329
Size:  74.1 KB

    A list of available connections will appear.
    (At the 3D Systems office, this list must be interesting!)

    Name:  Printer_204.jpg
Views: 1298
Size:  85.6 KB

    Select the connection you want and click the connect button.

    Name:  Printer_205.jpg
Views: 1345
Size:  86.9 KB

    The software will test the connection and report the results.

    Name:  Printer_206.jpg
Views: 1263
Size:  64.9 KB

    We now have a connection to the printer and at least one .cube file ready to print.
    Press the Print button in the upper right of the interface screen.
    (The alternative would be to save the file to a USB thumb drive, to do that you would press the save button at the bottom of the screen.)

    Name:  Printer_207.jpg
Views: 1281
Size:  95.6 KB

    After pressing the Print button (or the Save button), a window opens where you navigate to the file you wish to print.
    In our case, that file is called RookPLA.cube. Select it and press the Open button.

    Name:  Printer_208.jpg
Views: 1261
Size:  80.7 KB

    And we're off! The software sends the file to the printer to be printed.
    That process will be detailed in the next update.

  31. #31
    Awards Officer
    2nd Lieutenant
    United States

    Join Date
    Feb 2013
    Location
    Prescott, Arizona
    Log Entries
    661
    Name
    Bruce

    Default 3D Printer - Back (track) to the Printer

    In the last installment, we set up the file in the software and sent it to the 3D printer through the Wi Fi Connection.
    If the printer is ready to go, the object will start printing now.
    There are, however, a few last setup items that you need to do to the printer every now and then.
    Before we see the object start printing, let's look at them.


    Name:  Printer_301.jpg
Views: 1197
Size:  128.9 KB

    It is important that the head of the printer be at the right height.
    The cube setup (and the setup for most other 3D printers of this type)
    Say to do this by setting the head just more than a regular thickness sheet of paper distance from the print surface.
    Some other docs I have seen recommend using two paper thicknesses.
    In actual distance, 0.1mm to 0.15mm seems about where this lands.


    Name:  Printer_302.jpg
Views: 1157
Size:  105.3 KB

    The filament for the cube line of printers comes in cartridges.
    The cartridge has a setscrew with a red plastic head that keeps the spool from unraveling inside the cartridge.


    Name:  Printer_303.jpg
Views: 1184
Size:  82.3 KB

    Before you load the cartridge, you remove this setcrew.
    Save this screw. If you change print colors you replace the screw in the cartridge that you remove.


    Name:  Printer_304.jpg
Views: 1175
Size:  97.1 KB

    The cartridge also has a contact at the bottom that lets it communicate with the cube.
    The main function of this is to let the cube know which type of filament (ABS or PLA) is in the cartridge.
    The type of filament used will change set the way the print head functions so that it is optimized for that material.


    Name:  Printer_305.jpg
Views: 1197
Size:  125.7 KB

    The cartridge is placed into a receptacle in the Cube.
    The filament is threaded through a hollow plastic tube and into the top of the print head.


    Name:  Printer_306.jpg
Views: 1170
Size:  119.9 KB

    Once the cartridge has been installed, the cube draws the filament into the head, melts it, and extrudes it out the bottom in a very fine semi liquid thread.
    When extruded, the thread is very hot.


    Name:  Printer_307.jpg
Views: 1154
Size:  114.7 KB

    The filament will extrude for about a foot.


    Name:  Printer_308.jpg
Views: 1163
Size:  132.7 KB

    Before the object is printed, the glass plate is coated with the special sticky material that comes with the cube.
    This helps hold the object in place as it is being built.

    THIS IS THE POINT AT WHICH YOU DIRECT THE SOFTWARE TO SEND THE ITEM TO THE CUBE TO BE PRINTED
    OR, USE THE TOUCH PANEL ON THE CUBE TO SELECT THE ITEM TO BE PRINTED FROM A USB THUMB DRIVE


    Name:  Printer_309.jpg
Views: 1146
Size:  134.8 KB

    The head will move to a position close to the printing surface and do final heat regulation.


    Name:  Printer_310.jpg
Views: 1152
Size:  139.1 KB

    At long last our object starts printing.
    Remember the software calculated the time to print this object as about an hour and a half.

    The object printing will continue (and conclude) in the next update...
    Attached Images Attached Images  

  32. #32
    Awards Officer
    2nd Lieutenant
    United States

    Join Date
    Feb 2013
    Location
    Prescott, Arizona
    Log Entries
    661
    Name
    Bruce

    Default The 3D Object Appears! (finally)

    In this installment the 3D object finally appears.
    This has not all gone as cleanly as possible.
    You may notice that the nice cover is no longer on the print head.
    Also, the filament is now white.
    More on that later...


    Name:  Printer_401a.JPG
Views: 1148
Size:  108.9 KB

    The object builds from the bottom up.
    It does this in repeated steps by setting down a layer of structure and then lowering the build platform a fraction of a milimeter.
    At this point, the inner structure of the "Strong" configuration (half way between hollow and solid) is visible.


    Name:  Printer_402a.JPG
Views: 1158
Size:  112.3 KB

    The object build is mezmorizing.
    The low detail in this image is more a result of the flash than the object.


    Name:  Printer_403a.jpg
Views: 1125
Size:  127.1 KB

    As the object build continues, the stone block surface structure of the rook becomes apparent.
    Creating a completely smooth surface with this type of printer is really not possible.
    The best you will get is a woven cloth type look so it is best to build objects that have some surface texture anyway.


    Name:  Printer_404a.jpg
Views: 1125
Size:  127.6 KB

    A slightly different angle that shows the surface detail a bit better as the object builds.
    Notice that the top of the doorway opening is arched. This is not just a coincidence but rather a design built to work around the elevated horizontal surface bottom limitation of this type of printer.


    Name:  Printer_405a.jpg
Views: 1135
Size:  128.7 KB

    Extending a surface out over empty space can be done to a limited degree without supports.
    Think of this like stacking bricks. You can offset a higher course to a degree to create an arch or inverted pyramid type structure.


    Name:  Printer_406a.jpg
Views: 1107
Size:  113.0 KB

    Just about done.
    The rook includes a double helix and spiral staircase on the inside as part of this single piece.
    These are viewable through the windows.
    It would be almost impossible to create an inner structure of this type any other way.


    Name:  Printer_407a.jpg
Views: 1108
Size:  99.9 KB

    When the print run finished, the build platform lowers away from the print head.
    The cube display will tell you to wait while the system cools.
    Notice the bit of filament still attached to the top of the rook.
    This can be brushed away easily.


    Name:  Printer_408a.jpg
Views: 1111
Size:  63.4 KB

    The glue that is used to keep the object in place as it builds is water soluable.
    The official way to remove the object is to place the object and build platform in warm water for a few minutes.
    The object will then either float free or can be easily detacted.
    The build platform is then cleaned of any residual glue to make it ready for the next run.

    Placing the right amount of glue on the build platform is a learned skill.
    It is actually easier to put too much on than too little.
    It should also be done just before the object is built to get the right amount of tackiness.


    In the next installment, I will talk about some of the dark side of 3D printing and what happened to the print head cover and why the filament changed color.

  33. #33

    Default

    Simply brilliant and clear explanation of the whole process, well done.

  34. #34
    Awards Officer
    2nd Lieutenant
    United States

    Join Date
    Feb 2013
    Location
    Prescott, Arizona
    Log Entries
    661
    Name
    Bruce

    Default 3D Printer - Results and Problems So Far

    So an object has now been printed successfully.
    Of the 25 object files tha come with the printer, I found the chess rook to be the most visually interesting.
    That is part of the reason I used it for the initial tests.

    The other is that it is a game object.

    When you purchase the printer, you get an option to buy three additional filament containers in your choice of colors.
    The ones that I selected were Red White and Blue (or Blue White and Red if you prefer).
    The printer also comes with a container of neon green filament.

    I tested printing with each of these with mixed results.


    Name:  Printer_501.jpg
Views: 1093
Size:  70.2 KB

    The rook printed in each of the four colors.
    The sparkly hilights are just an artfact of the camera flash reflection.


    Name:  Printer_502.jpg
Views: 1100
Size:  92.1 KB

    Looking down on the blue rook, you can see the top of the spiral staircase emerging from the center of the object.
    You can also see the result of printing a flat or smooth surface. While the surface will never be mistaken for an injection molded piece, the surface does actually seem to me to resemble decking.


    Name:  Printer_503.jpg
Views: 1091
Size:  90.5 KB

    One other object that I printed was this tea cup.
    I included this image because it demonstrates two things:
    It shows the support structure that the software builds when it is asked to traverse a large horizoltal-ish span (inside and below the handle). This support structure is actually only slightly attached and can be readily removed. The detachment points can then be shaved/filed/sanded/whatever.
    This object also gives a look at what you get from trying to model a smooth surface. The flash exagerates the surface detail a bit. In real life it does have a satiny woven material look to it.

    Now for the Dark Side

    All print runs did not go so well.


    Name:  Printer_504.jpg
Views: 1103
Size:  76.6 KB

    A number of the attempts were not successful.
    This was always reported by the cube as a filament flow error.
    The run would abort and you would be left with a partial object.
    Yes, the neon green filament was the main source of these errors though it did happen once with another color.
    The cube comes with a piece of piano wire and instructions on how to clear the clogs that often happen when a fail of this type happens.
    I found it far easier to clean the print head with the pretty cover off, and eventually just wound up leaving it off.


    Name:  Printer_505.jpg
Views: 1089
Size:  65.5 KB

    Even the "successful" green run almost aborted due to filament flow issues(top of the base) and would have to be considered a fail.

    All of this clogging and failing resulted in numerous emails and a call or two with the US based 3D Systems tech support folks.
    In the end, they decided to send me another print head.


    Name:  Printer_506.jpg
Views: 1067
Size:  114.4 KB

    The new print head, along with instructions for replacing the old head arrived today.
    I have yet to swap the heads but will report from the far side of this change shortly.

    Judging from the comments on the boards of various 3D printer models, filament flow problems are common in the 3D printer world and more common at the low cost printer end of the market.

    If I am able to change the head and get the printer reliably operational, I will probably go ahead and buy another head just to have as a spare.

  35. #35
    Retired Admiral of the Fleet
    Admiral
    United States

    Join Date
    Jan 2013
    Location
    Chicago/Bloomington IL
    Log Entries
    5,095
    Name
    Eric

    Default

    Awesome. Absolutely awesome.

    As for the tea cup, I thought the support was part of the design - towers somewhat Lord of the Rings-ish. Shows how much I know.

  36. #36
    Awards Officer
    2nd Lieutenant
    United States

    Join Date
    Feb 2013
    Location
    Prescott, Arizona
    Log Entries
    661
    Name
    Bruce

    Default In the Meantime...

    New printer head has been installed and the printer is chewing on a new project.

    I will have a full update on that tomorrow.

    In the meantime:

    Name:  Printer_601.jpg
Views: 1162
Size:  60.2 KB

    Name:  Printer_602.jpg
Views: 1184
Size:  60.6 KB

    Decks and spars added to 3D Model.

  37. #37

    Default

    Are you going to try to print this as a single item, or rather do a separate print run for the masts etc, maybe on a sprue?

  38. #38
    Midshipman
    Netherlands

    Join Date
    Mar 2013
    Location
    North Holland
    Log Entries
    362
    Name
    Chris

    Default

    This is a fascinating tour of the 3D printer. Really looking forward to more episodes and to the time when you print a ship.

  39. #39
    Awards Officer
    2nd Lieutenant
    United States

    Join Date
    Feb 2013
    Location
    Prescott, Arizona
    Log Entries
    661
    Name
    Bruce

    Default

    Quote Originally Posted by Berthier View Post
    Are you going to try to print this as a single item, or rather do a separate print run for the masts etc, maybe on a sprue?
    Thanks for the interest, comments, and other acknowledgements, I really appreciate it.

    I'm sure that I will need to separate the ship into multiple pieces.

    I will probably wind up doing a number of tests to see what detail level can be held and what is the best way to configure the parts.

    I stil have sails, gunports and other hull detals, deck details, and a bit more to add.

    I had origininally been thinking of one piece for the hull and one for each mast/sail group similar to how the white metal models are cast.

    One tricky element that I really want to include in the printed model is the fighting top platform on each mast.
    Since the fighting tops are at 90 degree angles to the line of the masts and sails, positioning the mast/sail structure on the build platform will be a challenge.
    I have no idea how I will get that to work without splitting the ship model into a much larger number of parts.

  40. #40
    Awards Officer
    2nd Lieutenant
    United States

    Join Date
    Feb 2013
    Location
    Prescott, Arizona
    Log Entries
    661
    Name
    Bruce

    Default

    Quote Originally Posted by Sea Gull View Post
    This is a fascinating tour of the 3D printer. Really looking forward to more episodes and to the time when you print a ship.
    Thanks!
    I am too.
    It is going to take a while for me to get to that point. The print head problem derailed things for a while but it looks like all is back on line now.

  41. #41
    Awards Officer
    2nd Lieutenant
    United States

    Join Date
    Feb 2013
    Location
    Prescott, Arizona
    Log Entries
    661
    Name
    Bruce

    Default

    Quote Originally Posted by 7eat51 View Post
    Awesome. Absolutely awesome.

    As for the tea cup, I thought the support was part of the design - towers somewhat Lord of the Rings-ish. Shows how much I know.
    Thanks!

    The first object that I chose to build to test the new print head has a good deal more of that support structure going on.

    It's kind of funny. The process takes an our or more to play out, and I know what the thing will look like in the end but it is still mezmorizing.

  42. #42
    Retired Admiral of the Fleet
    Admiral
    United States

    Join Date
    Jan 2013
    Location
    Chicago/Bloomington IL
    Log Entries
    5,095
    Name
    Eric

    Default

    Quote Originally Posted by RichardPF View Post
    It's kind of funny. The process takes an our or more to play out, and I know what the thing will look like in the end but it is still mezmorizing.
    I can imagine. Looking at your in-process pics was pretty cool.

    Concerning the chess piece, how hard, brittle, heavy is it? How much does it cost in terms of materials?

    You have created a fascinating thread Bruce.

  43. #43
    Awards Officer
    2nd Lieutenant
    United States

    Join Date
    Feb 2013
    Location
    Prescott, Arizona
    Log Entries
    661
    Name
    Bruce

    Default

    Quote Originally Posted by 7eat51 View Post
    I can imagine. Looking at your in-process pics was pretty cool.

    Concerning the chess piece, how hard, brittle, heavy is it? How much does it cost in terms of materials?

    You have created a fascinating thread Bruce.
    The Cube printers will print with both ABS and PLA plastic.
    The plastic filament that I have been using is the PLA.

    My understaning is that PLA holds detail better but is not as tough as the ABS.
    The printed objects are quite hard, but do not seem to be anywhere near as brittle as resin cast objects.
    As built, the objects are also extremely light.
    I am sure that is in part due to the fact that I use the "strong" option when setting up the files for the parts I have created so far.
    The strong options creates parts with the honeycomb inside structure.

    My best guess, based on somewhat limited experience is that the material used for one of the rooks costs about two dollars.
    The material for a ship model in the scale we are talking about might cost a bit more than that, but not a lot.
    If you were trying to do this commercially, my guess is that the amortization of the equipment would be a significant cost factor.
    You would likely want to use higher cost equipment and, as fast as this technology is moving, I expect that the economic life of a commercial grade 3D printer will be far less than the potential functional life.

  44. #44
    Comptroller of the Navy Board
    Captain
    United States

    Join Date
    Feb 2012
    Location
    WA
    Log Entries
    4,300
    Name
    [RESTRICTED]

    Default

    Stupid question... will Cube's software convert a SketchUp .SKP into a .STL? The new eight-blade rotor hub I referred to above is a SketchUp file, mainly because I haven't learned solid-modeling yet. (AutoCAD/DraftSight and SketchUp I'm comfortable with, Solidworks scared the crap out of me and I uninstalled it.)

  45. #45
    Awards Officer
    2nd Lieutenant
    United States

    Join Date
    Feb 2013
    Location
    Prescott, Arizona
    Log Entries
    661
    Name
    Bruce

    Default Why would that be a stupid question?

    Quote Originally Posted by Diamondback View Post
    Stupid question... will Cube's software convert a SketchUp .SKP into a .STL? The new eight-blade rotor hub I referred to above is a SketchUp file, mainly because I haven't learned solid-modeling yet. (AutoCAD/DraftSight and SketchUp I'm comfortable with, Solidworks scared the crap out of me and I uninstalled it.)
    The quick answer is no, the Cube software does not accept or convert .SKP files.
    Hunting around I did find some third party solutions that do this (or rather multiple step processes), but none of the ones I found appeared that stable.
    If you have SketchUp Pro you can export to a number of file formats that are easier for the outside world to convert to .STL such as OBJ, FBX, and others.

    You can also get a free 30 day license to 3D Studio Max which does export directly to .stl files and you may find more approachable given the software with which you are already familiar, though that would mean remodeling your object.

  46. #46
    Awards Officer
    2nd Lieutenant
    United States

    Join Date
    Feb 2013
    Location
    Prescott, Arizona
    Log Entries
    661
    Name
    Bruce

    Default New 3D Print Head Installed and Tested!

    So I installed the new print head.
    The instructions could have been a bit clearer, but the part was amazingly easy to swap.
    The process, from start to finish with me triple checking everything took no more than 15 minutes.

    As a first test, I went to the Cube site and downloaded one of the objects that they have available there.
    There was one object that I found quite inetresting.
    The design was such that it would need a significant amount of support structure and should be built using a raft.
    It was also far larger than any object that I had printed so far.
    I figured it would be a good example to post here - success or failure.

    Name:  067_3D_Printer_NewHead_01.JPG
Views: 1020
Size:  69.4 KB

    So far so good!
    The printer starts placing the filament on the glass...


    Name:  068_3D_Printer_NewHead_02.JPG
Views: 1028
Size:  68.9 KB

    First cross hatch of raft complete.
    The raft is an extra structure that you can add to the base to help it stay on the build surface.
    3D Systems says that you can "get away" without adding a raft by using the glue, but with such a large object I wanted to be safe.


    Name:  069_3D_Printer_NewHead_03.JPG
Views: 1017
Size:  74.7 KB

    Raft complete and the first layer of the base is added.


    Name:  070_3D_Printer_NewHead_04.JPG
Views: 1035
Size:  73.6 KB

    Object base taking shape with the familiar honeycomb inside.
    The base is round. The structures at the side of the base are part of the support structure. We will see lots more of that as the build continues.


    Name:  071_3D_Printer_NewHead_05.JPG
Views: 1008
Size:  69.8 KB

    Base complete.
    You can see the support structure attachment points at the sides of the base.
    Attached in this way theoretically allows the supports to be broken (or cut) away more easily when the object is complete.


    Name:  072_3D_Printer_NewHead_06.JPG
Views: 1015
Size:  69.0 KB

    As the build extends above the base, the support structure really kicks it up a notch.
    The support structure now completely surrounds the top of the base.


    Name:  073_3D_Printer_NewHead_07.JPG
Views: 999
Size:  69.2 KB

    Substantially more object height complete.
    Support structure continues on all sides.


    Name:  074_3D_Printer_NewHead_08.JPG
Views: 1025
Size:  71.2 KB

    Object nearing completion.
    It can now be seen what the support structures were supporting.


    Name:  075_3D_Printer_NewHead_09.JPG
Views: 1051
Size:  72.4 KB

    Object complete.
    The build ran without a hitch.
    This build was about 5 hours.
    I pushed the envelope a bit to test the new print head as this was the longest build and the largest object I have yet attempted.
    I did not want to press my luck to the point of doing the first test of the new head with the neon green filament that proved so troublesome with the old head.
    I'll save that test for a bit later.

    In the next update I will remove the supports and reveal the object.
    Last edited by RichardPF; 03-18-2013 at 01:48.

  47. #47

    Default

    So did you watch this for 5 hours...?

  48. #48
    Retired Admiral of the Fleet
    Admiral
    United States

    Join Date
    Jan 2013
    Location
    Chicago/Bloomington IL
    Log Entries
    5,095
    Name
    Eric

    Default

    This is pretty cool. It is neat to see how it incorporates support structures. Looking forward to seeing finished product.

  49. #49
    Awards Officer
    2nd Lieutenant
    United States

    Join Date
    Feb 2013
    Location
    Prescott, Arizona
    Log Entries
    661
    Name
    Bruce

    Default

    Quote Originally Posted by Berthier View Post
    So did you watch this for 5 hours...?
    Actually, no.

    I Just checked in on it every hour or so to make sure it was still building correctly and to take a picture to post here.

  50. #50
    Awards Officer
    2nd Lieutenant
    United States

    Join Date
    Feb 2013
    Location
    Prescott, Arizona
    Log Entries
    661
    Name
    Bruce

    Default And the object is...

    So I spent about 10 minutes removing the support structures.
    To do this right, I would want to spend about another half hour or more trimming and sanding the attachment points to clean the structure up a bit more.

    Name:  076_3D_Printer_NewHead_10.JPG
Views: 967
Size:  36.7 KB

    Printed object with supports removed.
    This example aslo shows you how a completely smooth and flat object surface of significant size would look on a printed object.
    Printed objects that have surfaces like this are generally finished by painting and sanding.
    Sometimes the painting is done with fairly standard paint, but sometimes it is done with cyanoacrylate (super glue).


    Name:  077_3D_Printer_NewHead_11.JPG
Views: 959
Size:  39.8 KB

    Size comparison between the Piston Cup model and the Rook


    Name:  078_3D_Printer_NewHead_12.JPG
Views: 963
Size:  46.9 KB

    The rooks have been popular items with the other instructors at the college.
    I decided to further stress test the printer by building more "inventory" to replace those that I had created before (and subsequently given away).
    Through all of this, the print head performed perfectly.
    There was, however, one failure.


    Name:  079_3D_Printer_NewHead_13.JPG
Views: 992
Size:  70.0 KB

    Here is how a rook turns out when there was not enough glue on the build platform!


    So I have ordered three more spools of PLA filament (in black, brown, and teal blue),
    I have ordered another print head, just to have on hand as a backup,
    and I have also orderer a bunch more of the special build platform glue!

    I will be taking a deep breath and trying the neon green filament again soon.
    Then hopefully it will be on to objects of my own design.

Bookmarks

Posting Permissions

  • You may not post new threads
  • You may not post replies
  • You may not post attachments
  • You may not edit your posts
  •